Vue 컴포넌트 export의 data, methods, event, watch, computed과 lifecycle에 대해 설명하겠습니다.
data
data는 Vue 컴포넌트에서 사용할 변수들을 선언합니다. data는 Key : Value로 구성됩니다.
그리고 변수는 <template>에서 바인딩하여 사용됩니다. 데이터 바인딩은 이중 중괄호(일명 Mustache - 무슈타쉬 - 수염)로 처리됩니다. 이중 중괄호는 HTML이 아닌 일반 텍스트로 데이터를 처리합니다.
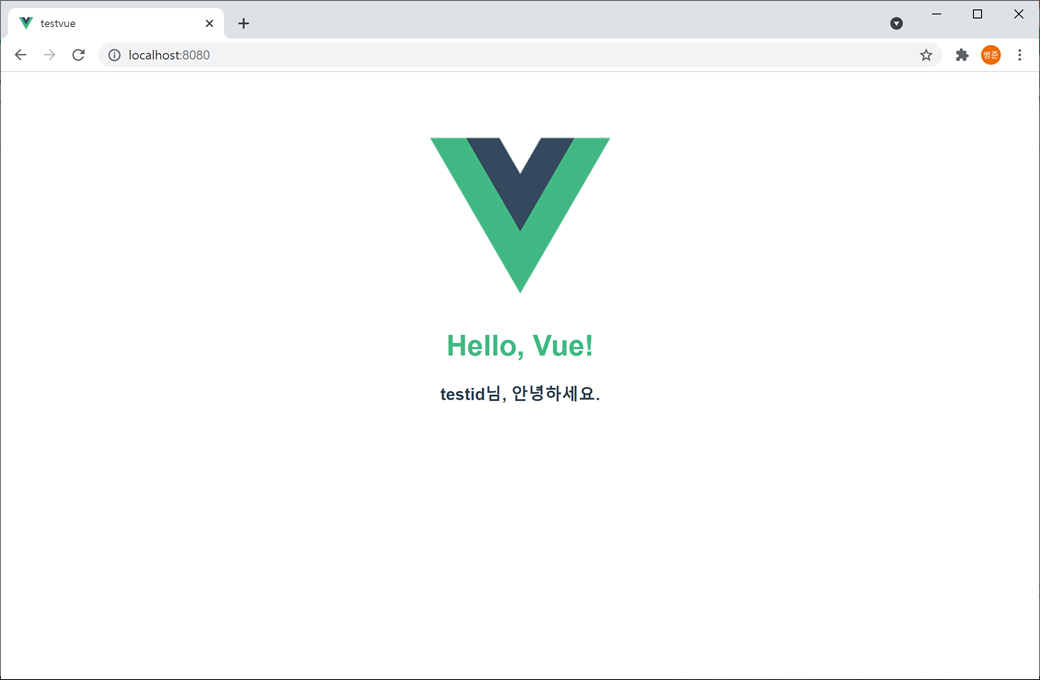
<template>
	<h1>Hello, Vue!</h1>
	<h3>{{userId}}님, 안녕하세요.</h3>
</template>

<script>
export default {
	name : 'TestComponent',
	data : function() {
		return {
			userId : 'testid'
		}
	}
}
</script>

<style>
h1 {
	color: #42b983;
}
</style>
data에 선언한 변수는 <template>에서 사용하지 않아도 문제는 없습니다. 그리고 data에서 선언되지 않은 변수를 <template>에서 사용하면 빈 공간으로 처리됩니다.
data 속성은 함수로 구성되어야 합니다.
data : function() {
	return {
		userId : 'testid'
	}
}

또는

data() {
	return {
		userId : 'testid'
	};
}
다음처럼 data를 함수로 선언하지 않으면 에러가 발생합니다.
data: {
	userId : ''
}
Object declaration on 'data' property is deprecated. Using function declaration instead - 'data' 속성에 대한 개체 선언은 더 이상 사용되지 않습니다. 대신 함수 선언으로 사용하세요.
'data' property in component must be a function - 컴포넌트의 'data' 속성은 함수이어야 합니다.
error: Object declaration on 'data' property is deprecated. Using function declaration instead
error: 'data' property in component must be a function
그 이유는 data 속성에 대한 개체 선언은 Vue2에서 사용되었지만 Vue 3에서 더 이상 사용되지 않습니다. Vue 3에서는 함수로 선언하여 사용해야 합니다.
data에 여러 개의 변수를 설정하여 사용할 수 있습니다.
<template>
	<h1>Hello, Vue!</h1>
	<div v-if="isLogin">{{userId}}({{userName}})님, 안녕하세요.</div>
	<div v-else>로그인하세요.</div>
</template>

<script>
export default {
	name : 'TestComponent',
	data : function() {
		return {
			userId : 'testid',
			userName : '홍길동',
			isLogin : true
		}
	}
}
</script>

<style>
h1 {
	color: #42b983;
}
</style>
data에 선언한 변수가 텍스트가 아닌 HTML로 되어 있다면 <template>에서 HTML으로 출력하기 위해서는 v-html Directive(디렉티브)를 사용합니다.
<span v-html="greetingHtml"></span><template>
<h1>Hello, Vue!</h1>
<div v-if="isLogin">{{userId}}({{userName}})님, <span v-html="greetingHtml"></span></div>
<div v-else>로그인하세요.</div>
</template>
<script>
export default {
name : 'TestComponent',
data : function() {
return {
userId : 'testid',
userName : '홍길동',
isLogin : true,
greetingHtml : '<span style="color:#0a45c7">안녕하세요.</span>'
}
}
}
</script>
<style>
h1 {
color: #42b983;
}
</style>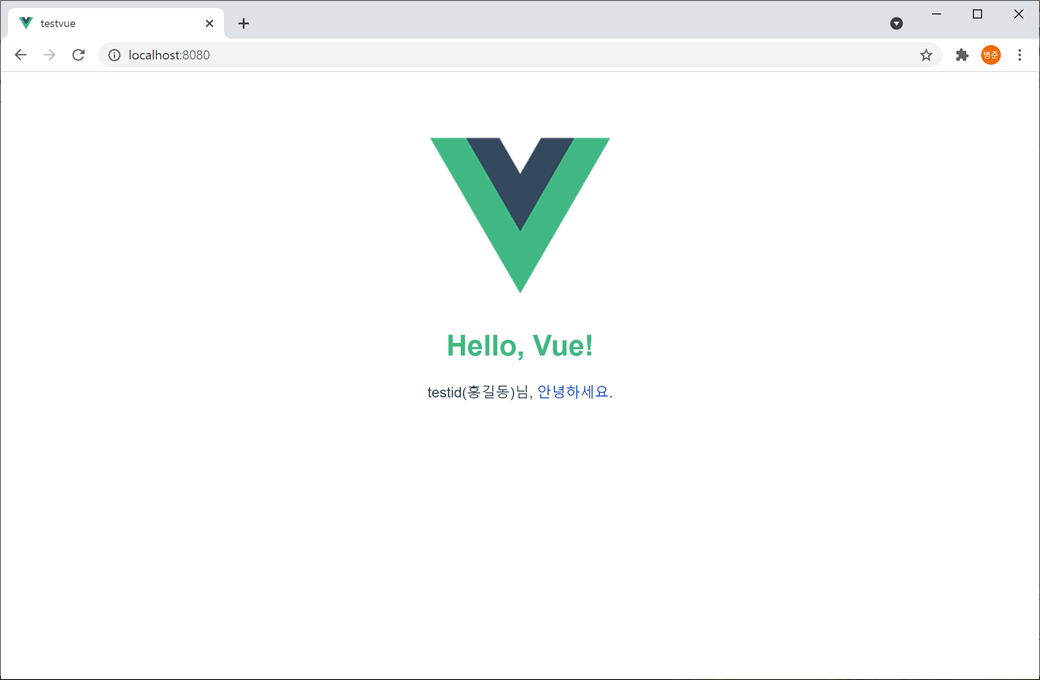
v-html를 이용하여 HTML을 동적으로 렌더링 하면 XSS(Cross-Site Scripting - 사용자가 웹 사이트에 스크립트를 삽입하여 공격하는 방법)로 보안이 취약해질 수 있습니다.
여기서는 테스트를 위해 사용하였습니다. 사용은 권장하지 않습니다.
<template>과 <script>를 이용하여 처리하시기 바랍니다.
Directive(디렉티브)
디렉티브는 지시문으로 <template>에서 v- 접두사가 붙어 사용되는 속성입니다.
디렉티브를 이용하여 동적으로 변경되는 값에 따라 조건부 처리나 이벤트, 바인딩 처리 등을 합니다.
Vue 조건부 렌더링
v-if는 조건이 true일 때 블록을 렌더링 합니다.
<div v-if="isLogin">{{userId}}({{userName}})님, 안녕하세요.</div>isLogin 변수가 true이면 <div>가 렌더링 되어 노출됩니다.
v-else는 v-if에 대한 else입니다. v-if 조건이 false일 때 블록을 렌더링 합니다.
<div v-else>로그인하세요.</div>isLogin 변수가 fasle이면 <div>가 렌더링 되어 노출됩니다.
v-else-if는 v-if에 대한 else if입니다. v-if와 v-else 사이에 여러 개를 사용할 수 있습니다.
<div v-else-if="userState === guest">회원가입하세요.</div>
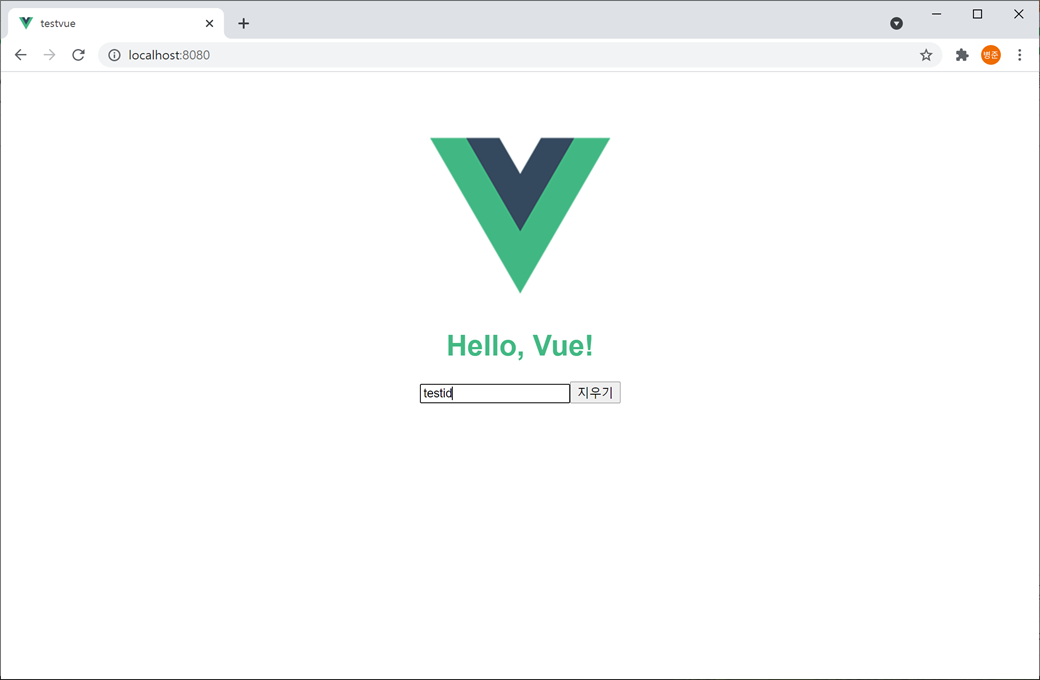
Vue 컴포넌트에서 methods와 events를 이용해 동적으로 처리할 수 있습니다.
methods
methods는 Vue 컴포넌트에서 사용할 메서드들을 선언합니다.
그리고 메서드는 <template>에서 이벤트로 호출되어 사용할 수 있습니다.
<template>
	<h1>Hello, Vue!</h1>
	<input type="text" placeholder="아이디를 입력하세요." v-model="userId">
	<button @click="clearUserId" v-show="userId != ''">지우기</button>
</template>

<script>
export default {
	name : 'TestComponent',
	data : function() {
		return {
			userId : ''
		}
	},
	methods : {
		clearUserId() {
			this.userId = '';
		}
	}
}
</script>

<style>
h1 {
	color: #42b983;
}
</style>
입력란에 문자를 하나 이상 입력하면 "지우기"버튼이 노출됩니다. 그리고 "지우기"버튼을 클릭하면 입력란에 입력한 문자가 없어지고 "지우기"버튼도 사라집니다.
메서드에서 Vue 컴포넌트에서 사용되는 변수를 사용하기 위해서 this를 사용합니다. this는 Vue 컴포넌트를 가리킵니다.
this.userId = '';
Vue 폼 입력 바인딩
<template> 안에 있는 <input>과 <textarea>, <select>과 같은 입력 태그에서 Vue 컴포넌트에서 사용되는 변수에 값을 전달하기 위해서 v-model를 사용합니다.
<input type="text" placeholder="아이디를 입력하세요." v-model="userId">v-modle를 이용하여 data에 선언된 변수와 연결됩니다.
Vue 메서드 이벤트 핸들러
메서드는 <template> 안에 있는 태그들의 이벤트를 통해 호출됩니다.
<button v-on:click="clearUserId" v-show="userId != ''">지우기</button>

또는

<button @click="clearUserId" v-show="userId != ''">지우기</button>
v-on:은 @으로 약어 처리할 수 있습니다.
v-on:click 또는 @click은 button이 클릭될 때 호출되는 클릭 이벤트입니다. v-on:click 또는 @click에 methods에서 선언된 메서드를 입력합니다.
v-show는 조건이 true이면 노출됩니다. 즉 userId와 연결된 입력 태그에 값이 없으면 버튼이 노출되지 않고 값이 있으면 버튼이 노출됩니다.
메서드에서 네이티브 DOM 이벤트를 사용하고 싶으시면 메서드에서 파라미터로 event를 설정하면 됩니다.
clearUserId(event) {
	this.userId = '';
	alert(event.target.tagName);
}
event를 설정하고 메서드에서 event를 사용하지 않으면 "is defined but never used - 정의되었지만 사용되지 않았습니다."라는 에러가 발생합니다.
error : 'event' is defined but never used
watch
watch는 Vue 컴포넌트에서 사용되는 변수를 모니터링하며 변경되면 호출됩니다.
watch의 메서드 명은 변수 명과 동일해야 합니다.
그래서 변수 값이 변경될 때 연산을 처리하거나 변수 값에 따라 화면을 제어할 때 사용합니다.
<template>
	<h1>Hello, Vue!</h1>
	<input type="text" placeholder="아이디를 입력하세요." v-model="userId">
	<button @click="clearUserId" v-show="userId != ''">지우기</button>
	<div v-show="userId != ''">{{reversedUserId}}</div>
</template>

<script>
export default {
	name : 'TestComponent',
	data : function() {
		return {
			userId : '',
			reversedUserId : ''
		}
	},
	methods : {
		clearUserId() {
			this.userId = '';
		}
	},
	watch : {
		userId() {
			this.reversedUserId = this.userId.split('').reverse().join('');
		}
	}
}
</script>

<style>
h1 {
	color: #42b983;
}
</style>
입력란에 문자를 하나 이상 입력하면 입력한 문자를 뒤집어서 노출됩니다.
입력란과 연결된 userId 변수가 변경이 되면 watch에 있는 userId() 메서드가 실행됩니다. userId() 메서드는 userId 변수의 값을 뒤집어 reversedUserId 변수에 저장되고 노출됩니다.

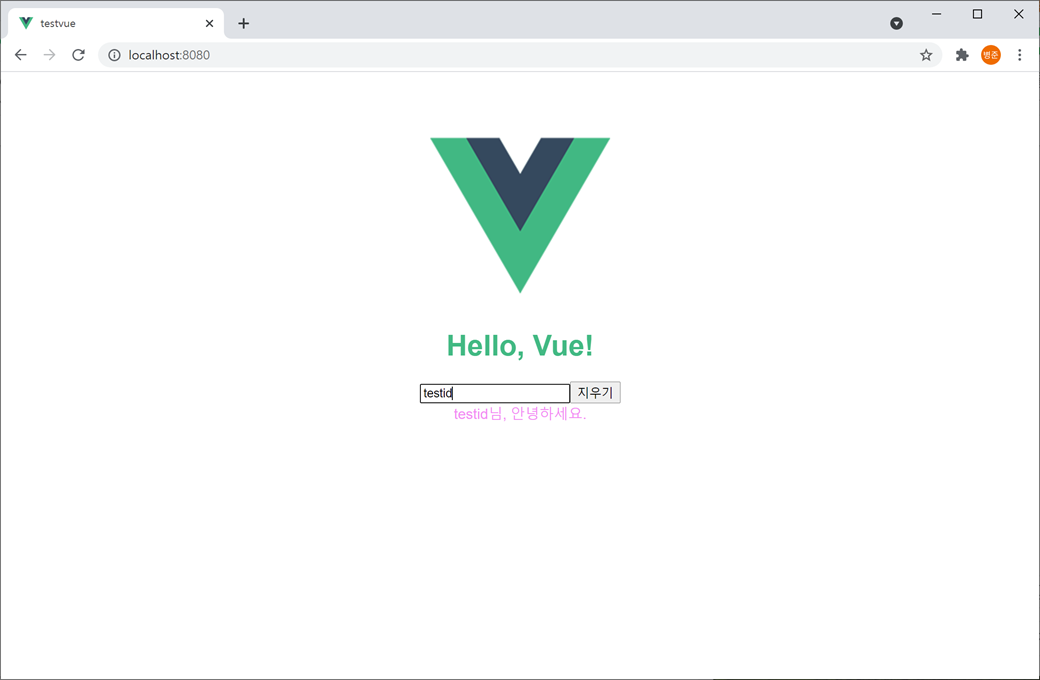
computed
computed는 메서드 명으로 호출되고 처리 결과를 리턴합니다. computed는 getter와 같은 구조입니다.
그래서 변수 값을 가공하여 노출하거나 변수의 값을 이용하여 자동으로 계산하는 등 중간 처리하여 노출할 때 사용합니다.
<template>
	<h1>Hello, Vue!</h1>
	<input type="text" placeholder="아이디를 입력하세요." v-model="userId">
	<button @click="clearUserId" v-show="userId != ''">지우기</button>
	<div v-show="userId != ''">{{greeting}}</div>
</template>

<script>
export default {
	name : 'TestComponent',
	data : function() {
		return {
			userId : ''
		}
	},
	methods : {
		clearUserId() {
			this.userId = '';
		}
	},
	computed : {
		greeting() {
			return this.userId + "님, 안녕하세요.";
		}
	}
}
</script>

<style>
h1 {
	color: #42b983;
}
</style>
입력란에 문자를 하나 이상 입력하면 입력된 문자로 환영 인사말이 노출됩니다.

Vue 컴포넌트 라이프 사이클
beforeCreate -> created -> beforeMount -> mounted -> beforeUpdate -> updated -> beforeUnmount -> unmounted 순으로 진행됩니다.
Vue 컴포넌트 created 호출
+- components에 있는 Vue 컴포넌트 created 호출
+- components에 있는 Vue 컴포넌트 mounted 호출
Vue 컴포넌트 mounted 호출
created
created는 Vue 컴포넌트 인스턴스가 생성될 때 호출됩니다.
Vue 컴포넌트의 data와 methods가 완료된 후 호출되기 때문에 data에 있는 변수들에 접근할 수 있습니다.
그래서 Vue 컴포넌트에서 변수 초기화나 이벤트를 등록할 때 사용합니다.
<template>
	<h1>Hello, Vue!</h1>
	<input type="text" placeholder="아이디를 입력하세요." v-model="userId">
	<button @click="clearUserId" v-show="userId != ''">지우기</button>
	<div v-show="userId != ''">{{greeting}}</div>
</template>

<script>
export default {
	name : 'TestComponent',
	data : function() {
		return {
			userId : ''
		}
	},
	methods : {
		clearUserId() {
			this.userId = '';
		}
	},
	computed : {
		greeting() {
			return this.userId + "님, 안녕하세요.";
		}
	},
	created() {
		this.userId = '';
	}
}
</script>

<style>
h1 {
	color: #42b983;
}
</style>
mounted
mounted는 components에 있는 Vue 컴포넌트들이 마운트(로딩되어 랜더링이 완료)되면 호출됩니다.
다만, 모든 Vue 컴포넌트가 마운트 되었음을 보장하지 않습니다.
그래서 메서드를 호출하거나 DOM으로 <template> 안에 있는 태그를 처리할 때 사용합니다.
<template>
	<h1>Hello, Vue!</h1>
	<input type="text" placeholder="아이디를 입력하세요." v-model="userId" ref="userIdInput">
	<button @click="clearUserId" v-show="userId != ''" ref="clearButton">지우기</button>
	<div v-show="userId != ''">{{greeting}}</div>
</template>

<script>
export default {
	name : 'TestComponent',
	data : function() {
		return {
			userId : ''
		}
	},
	methods : {
		clearUserId() {
			this.userId = '';
		}
	},
	computed : {
		greeting() {
			return this.userId + "님, 안녕하세요.";
		}
	},
	mounted() {
		this.$refs.userIdInput.focus();
		this.$refs.clearButton.innerText = "지움";
	}
}
</script>

<style>
h1 {
	color: #42b983;
}
</style>
Vue 컴포넌트에서 <template>에 있는 태그를 DOM으로 접근하기 위해서는 태그에 ref로 레퍼런스 ID를 추가하면 됩니다, 그러면 직접 접근할 수 있습니다.
<input type="text" placeholder="아이디를 입력하세요." v-model="userId" ref="userIdInput">
<button @click="clearUserId" v-show="userId != ''" ref="clearButton">지우기</button>
그리고 레퍼런스 ID를 접근하기 위해서 Vue 컴포넌트의 $refs를 이용합니다.
this.$refs.{레퍼런스 ID}.{DOM 함수 또는 속성}this.$refs.userIdInput.focus();
this.$refs.clearButton.innerText = "지움";Vue 컴포넌트가 마운트가 완료되면 입력란에 포커스를 줍니다. 그리고 버튼에 텍스트를 "지움"으로 변경합니다.

updated
updated는 Vue 컴포넌트에서 사용되는 변수들의 값이 변경되면 호출됩니다.
<template>
	<h1>Hello, Vue!</h1>
	<input type="text" placeholder="아이디를 입력하세요." v-model="userId">
	<button @click="clearUserId" v-show="userId != ''">지우기</button>
	<div v-show="userId != ''" ref="greetingText">{{greeting}}</div>
</template>

<script>
export default {
	name : 'TestComponent',
	data : function() {
		return {
			userId : ''
		}
	},
	methods : {
		clearUserId() {
			this.userId = '';
		}
	},
	computed : {
		greeting() {
			return this.userId + "님, 안녕하세요.";
		}
	},
	updated() {
		this.$refs.greetingText.style.color = "#" + ((1 << 24) * Math.random() | 0).toString(16);
	}
}
</script>

<style>
h1 {
	color: #42b983;
}
</style>
Vue 컴포넌트에 있는 변수들의 값이 변경 updated() 메서드를 호출되고 환영 인사말의 폰트 컬러가 랜덤으로 변경됩니다.
updated 메소는 Vue 컴포넌트 전체에서 처리하고자 할 때 사용하는 것이 좋습니다. 단순한 변경 처리가 필요할 경우 watch나 computed를 사용하기 바랍니다.
unmounted
unmounted는 Vue 컴포넌트가 제거될 때 호출됩니다.
unmounted() {
}