웹 브라우저가 서버에 있는 파일을 다운로드 받을 때 파일을 한번에 다운로드하는게 아니라 여러 번에 나누어서 다운로드 합니다. 이때 사용되는 기술이 HTTP 범위 요청(HTTP range requests)입니다.
HTTP 범위 요청(HTTP range requests)은 클라이언트가 서버에 리소스의 일부(특정 범위)를 보내달라고 요청하는 겁니다.
이 기술은 미디어 플레이어, 대용량 파일 다운로드에서 사용되고 있습니다.
HTTP 범위 요청(HTTP range requests)
HTTP 범위 요청 (https://developer.mozilla.org/en-US/docs/Web/HTTP/Range_requests)
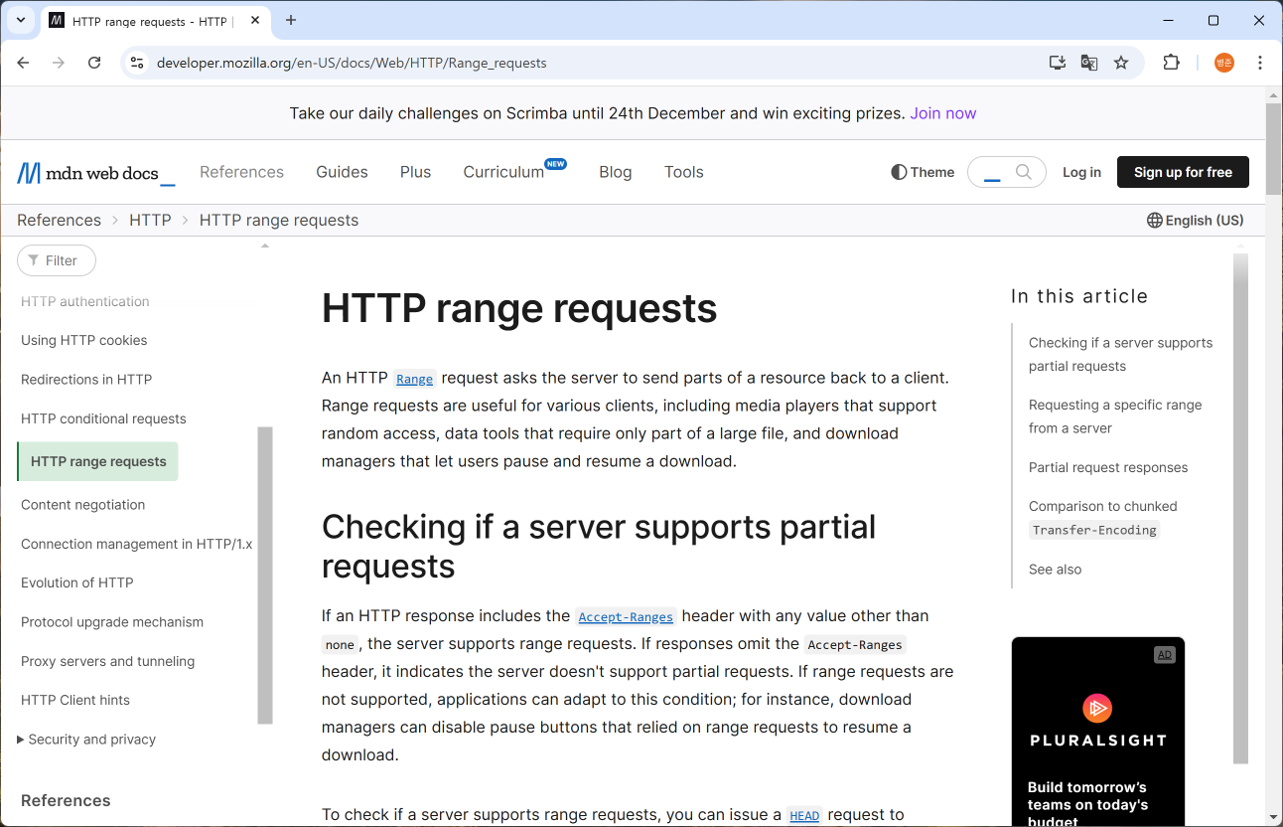
HTTP 범위 요청(HTTP range requests)을 사용하기 위해서 서버가 HTTP 범위 요청을 지원하는지 확인해야 합니다.
HEAD 요청 vs GET 요청
HEAD 요청은 서버에서 응답 본문(Body)을 제외한 헤더(Header) 정보만 받아오는 메서드입니다.
GET 요청은 서버에 리소스를 요청하여 본문(Body)을 포함한 전체 데이터를 받아오는 메서드입니다.
1. HTTP 범위 요청 지원 여부 확인
HEAD 요청을 통해 HTTP 범위 요청을 지원하는지 확인할 수 있습니다.
HEAD /test.mov HTTP/2
Host: localhost:8080
Accept: */*
curl을 사용하는 경우 -I 플래그를 사용하여 HEAD 요청을 보낼 수 있습니다.
curl -I http://localhost:8080/test.mov
응답에서 Accept-Ranges: byte가 있다면 클라이언트가 범위 요청 시 byte 단위로 범위 요청할 수 있다고 알려줍니다.
서버가 범위 요청을 지원하지 않으면 Accept-Ranges 헤더가 없거나 Accept-Ranges: none으로 응답합니다.
HTTP/2 200
content-type: application/octet-stream
Last-Modified: Tue, 29 Oct 2024 06:35:21 GMT
accept-ranges: bytes
content-length: 63167050
HEAD 요청 응답으로 받은 Content-Length로 다운로드할 파일의 크기를 미리 파악할 수 있습니다.
postman을 사용하여 google 페이지에서 푸터에 있는 로고 파일(google-logo-footer.svg)을 HEAD 요청해보면 확인할 수 있습니다.
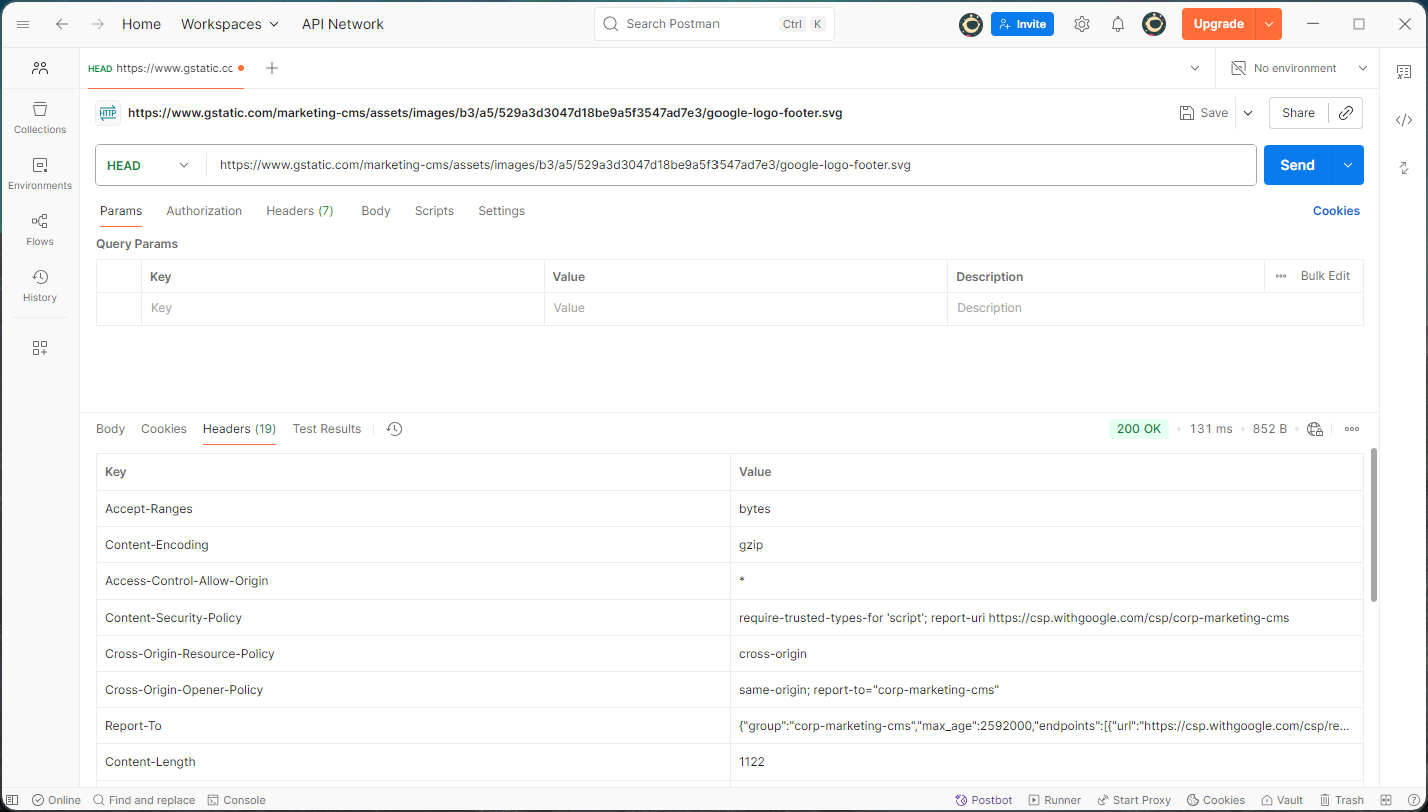
그렇지만, HEAD 요청에 대한 응답에서 Content-Length가 생략될 수 있습니다.
postman을 사용하여 localhost에 있는 테스트 이미지 파일(test.png)을 HEAD 요청해보면 Content-Length가 생략된 것을 확인할 수 있습니다.
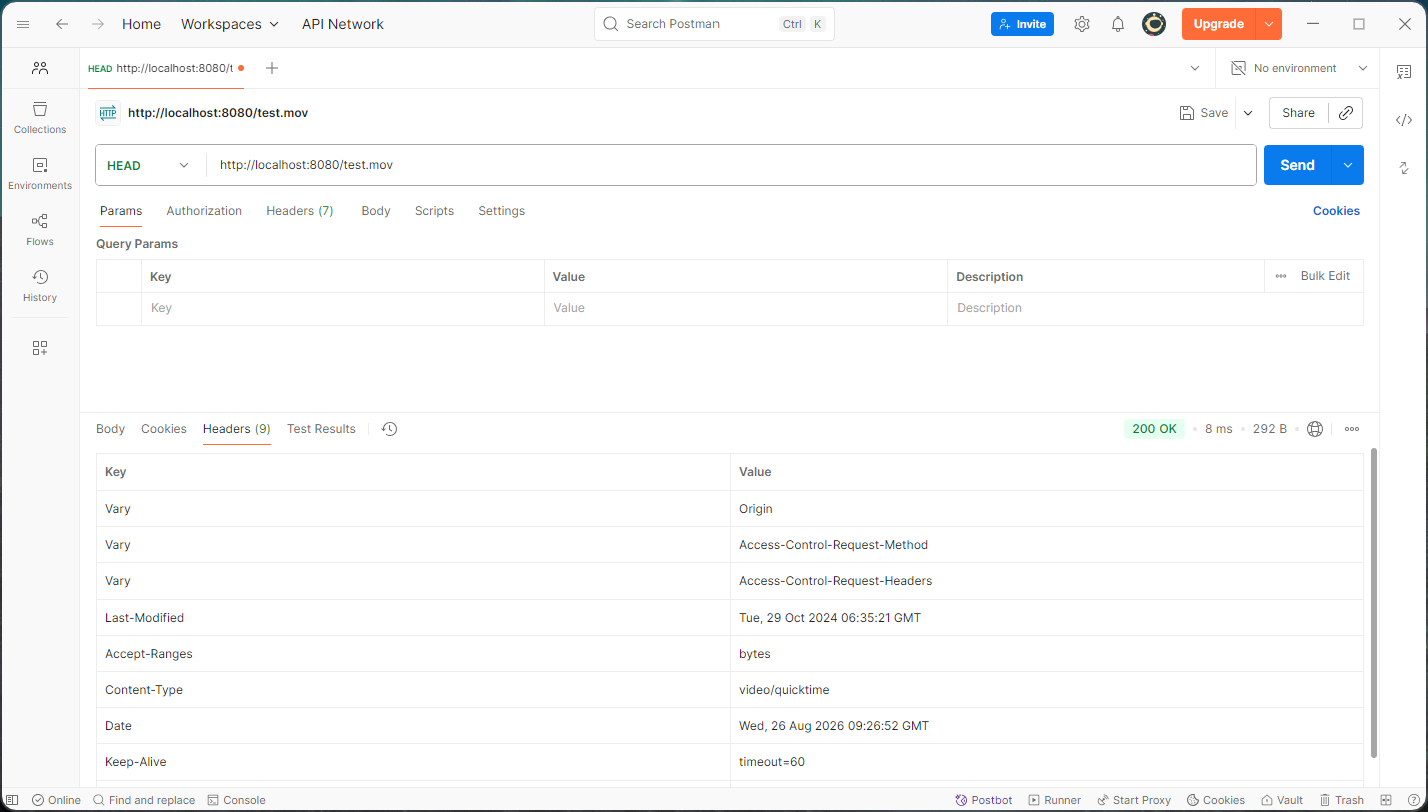
2. 범위 지정으로 데이터 요청
GET 요청에 Range 헤더를 포함시켜 byte 단위로 다운로드할 범위을 지정할 수 있습니다.
요청할 범위는 HEAD 요청 응답으로 받은 Content-Length 이내여야 합니다.
Range: bytes={시작바이트}-{종료바이트}GET /test.mov HTTP/2
Host: localhost:8080
User-Agent: Mozilla/5.0 (Windows NT 10.0; Win64; x64) AppleWebKit/537.36 (KHTML, like Gecko) Chrome/151.0.0.0 Safari/537.36
Accept: */*
Range: bytes=0-102300
범위 요청 따른 응답에서 응답 코드 206은 서버가 리소스 전체가 아닌 부분 콘텐츠(Partial Content)을 전송했음을 나타내는 성공 상태 코드입니다.
Content-Type 헤더로 멀티파트 바이트로 되어 있음을 나타냅니다.
Content-Length 헤더는 요청된 범위의 크기를 나타냅니다. (리소스 전체 크기를 나타내는 것은 아닙니다.)
Content-Range 헤더는 리소스 내에서 어느 위치에 해당하는지를 나타냅니다.
HTTP/2 206
content-type: application/octet-stream
content-length: 102400
content-range: bytes 0-102300/63167050

(binary content)
파일 다운로드 프로세스를 소스 코드로 설명
1. 클라이언트에서 HEAD 요청으로 다운로드 정보를 받아옵니다. (파일을 직접 호출하지 않는 방식으로 했습니다.)
// HEAD 요청으로 다운로드 정보를 받아옵니다.
const response = await fetch("/repository/download", {
    method: "HEAD"
});
if (!response.ok) {
    console.error("오류 :" + response.status);
    return;
}
2. 서버에서 HEAD 요청에 응답하기 위해 서버에 있는 test.mov파일을 읽어옵니다.
@WebServlet(name = "downloadServlet", urlPatterns = "/repository/download")
public class DownloadServlet extends HttpServlet {

    @Override
    protected void doHead(HttpServletRequest req, HttpServletResponse resp) throws ServletException, IOException {
        // 테스트를 위해 리소스에서 파일을 가져옵니다.
        URL resource = getClass().getClassLoader().getResource("static/test.mov");
        // 파일 경로
        String filePath = resource.getPath();

        // 파일 객체를 생성합니다.
        File file = new File(filePath);

        :

    }
}
3. HTTP 응답을 위해 헤더를 설정하여 정보를 전달합니다.
HTTP 응답 Content-Disposition 헤더는 컨텐츠가 브라우저에 inline 되어야 하는 웹 페이지 자체이거나 웹 페이지의 일부인지 아니면 attachment로써 다운로드 되거나 로컬에 저장될 용도로 쓰이는 것인지를 알려주는 헤더입니다.
HTTP 응답 본문(Body)에 데이터가 없기 때문에 Content-Length 대신 X-Content-Length 헤더를 추가하였습니다.
// 이진(binary) MIME 타입으로 처리
resp.setContentType("application/octet-stream");

// 다운로드 받을 파일의 이름을 알려줍니다.
String encodedFileName = URLEncoder.encode(file.getName(), StandardCharsets.UTF_8).replaceAll("\\+", "%20");
resp.setHeader("Content-Disposition", "attachment; filename*=UTF-8''" + encodedFileName);
//resp.setHeader("Content-Disposition", "attachment; filename=" + file.getName());

// 클라이언트가 범위 요청 시 byte 단위로 범위 요청할 수 있다고 알려줍니다.
resp.setHeader("Accept-Ranges", "bytes");

// 클라이언트에서 Content-Length 대신 X-Content-Length를 사용해야 합니다.
resp.setHeader("X-Content-Length", Long.toString(file.length()));
4. 클라이언트에서 HEAD 요청 응답 헤더에서 콘텐츠 크기와 파일 이름을 받습니다.
// 콘텐츠 크기
const contentLength = parseInt(response.headers.get("X-Content-Length"), 10);
console.log("다운로드 파일 크기: " + contentLength + "bytes");

// 다운로드 받을 파일의 이름
// attachment; filename*=UTF-8''test.mov
const contentDisposition =  response.headers.get("content-disposition");
let fileName = "";

if (contentDisposition) {
    const filenameMatch = contentDisposition.match(/filename\*=UTF-8''(.+)/i);
    if (filenameMatch && filenameMatch[1]) {
        fileName = decodeURIComponent(filenameMatch[1]);
    } else {
        // *=UTF-8이 아닌 경우 filename="value" or filename=value
        const filenameMatch = contentDisposition.match(/filename="?([^"]+)"?/i);
        if (filenameMatch && filenameMatch[1]) {
            fileName = filenameMatch[1];
        }
    }
}
console.log("파일 명: " + fileName);
5. HTTP 범위 요청으로 부분 콘텐츠를 받아 Blob 배열에 추가합니다.
GET 요청에 Range 헤더를 포함시켜 startIndex부터 endIndex까지 범위를 지정합니다.
// Blob 배열
const blobData = [];
// 시작 바이트 위치
let startIndex = 0;
// 청크 크기
cont chunkSize = 1024 * 100;

while (startIndex < contentLength) {
    // 종료 바이트 위치
    const endIndex = Math.min(startIndex + chunkSize - 1, contentLength - 1);
    console.log("다운로드 바이트 범위: ", startIndex, endIndex);

    // HTTP 범위 요청으로 데이터를 받아옵니다.
    const response = await fetch("/repository/download", {
        method: "GET",
        headers: {
            Range: "bytes=" + startIndex + "-" + endIndex
        },
    });

    if (!response.ok && response.status !== 206) {
        console.error("오류 :" + response.status);
        return;
    }

    // Blob를 가져옵니다.
    const chunkData = await response.blob();
    // Blob를 추가합니다.
    blobData.push(chunkData);

    startIndex = endIndex + 1;
}
6. 서버에서 Range 헤더에서 시작 바이트 위치와 종료 바이트 위치를 가져옵니다.
@WebServlet(name = "downloadServlet", urlPatterns = "/repository/download")
public class DownloadServlet extends HttpServlet {

    // 버퍼 크기 - 10KB
    private static final int BufferSize = 1024 * 10;

    @Override
    protected void doGet(HttpServletRequest req, HttpServletResponse resp) throws ServletException, IOException {

        :

        // 테스트를 위해 리소스에서 파일을 가져옵니다.
        URL resource = getClass().getClassLoader().getResource("static/test.mov");
        // 파일 경로
        String filePath = resource.getPath();

        // 파일 객체를 생성합니다.
        File file = new File(filePath);

        // 파일의 크기
        long fileLength = file.length();

        // 요청 헤더에서 Range를 가져옵니다.
        String headerRange = req.getHeader("Range");

        // bytes={시작 바이트 위치}-{종료 바이트 위치}
        // 시작 바이트 위치 (기본값으로 0)
        long startIndex = 0;
        // 종료 바이트 위치 (기본값으로 파일의 크기)
        long endIndex = fileLength - 1;
        if (headerRange != null && headerRange.startsWith("bytes=")) {
            String ranges = headerRange.substring(6);
            if (ranges != null && !ranges.isEmpty()) {
                String[] arRanges = ranges.split("-");
                startIndex = Long.parseLong(arRanges[0]);
                if (arRanges.length == 2 && !arRanges[1].isEmpty()) {
                    endIndex = Long.parseLong(arRanges[1]);
                }
            }
        }

        long contentLength = endIndex - startIndex + 1;

        :

    }
}
7. HTTP 응답을 위해 헤더를 설정하고 파일에서 지정한 범위 만큼만 반복해서 데이터를 읽어서 응답 스트림으로 내보냅니다.
Content-Range 헤더는 콘텐츠 범위(부분이 속한 위치)를 알려줍니다.
Content-Range: <unit> <range-start>-<range-end>/<size>
<unit> : 범위를 지정하는 단위(bytes)
<range-start> : 범위 요청의 시작
<range-start> : 범위 요청의 끝
<size> : 전체 크기
// 범위 요청 따른 응답 상태 값(206)입니다.
resp.setStatus(HttpServletResponse.SC_PARTIAL_CONTENT);

// 콘텐츠 범위(부분 메시지가 속한 위치)를 알려줍니다.
resp.setHeader("Content-Range", "bytes " + startIndex + "-" + endIndex + "/" + fileLength);

// Content-Length에 설정합니다.
resp.setContentLengthLong(contentLength);

// 이진(binary) MIME 타입으로 처리
resp.setContentType("application/octet-stream");

// 다운로드 받을 파일의 이름을 알려줍니다.
String encodedFileName = URLEncoder.encode(file.getName(), StandardCharsets.UTF_8).replaceAll("\\+", "%20");
resp.setHeader("Content-Disposition", "attachment; filename*=UTF-8''" + encodedFileName);
//resp.setHeader("Content-Disposition", "attachment; filename=" + file.getName());

// 클라이언트가 범위 요청 시 byte 단위로 범위 요청할 수 있다고 알려줍니다.
resp.setHeader("Accept-Ranges", "bytes");

FileInputStream fis = new FileInputStream(file);
// 응답 스트림
OutputStream outputStream = resp.getOutputStream();

byte[] buffer = new byte[1024 * 100];
int bytesRead = 0;
long bytesToRead = contentLength;

// 지정한 위치로 건너뜁니다.
fis.skip(startIndex);

// 버퍼 크기에 맞게 나누어서 읽어옵니다.
while ((bytesRead = fis.read(buffer, 0, (int) Math.min(buffer.length, bytesToRead))) > 0) {
    outputStream.write(buffer, 0, bytesRead);
    bytesToRead -= bytesRead;
}
8. 클라이언트에서 Blob(Binary Large Object)를 가리키는 임시 URL(Object URL)을 생성하고 자동 클릭하여 다운로드 시킨 후 임시 URL을 삭제합니다.
// Blob 객체
const blob = new Blob(blobData);
const aTag = document.createElement('a');
aTag.href = URL.createObjectURL(blob);
aTag.download = fileName;
aTag.click();
URL.revokeObjectURL(aTag.href);'Spring > 대용량 파일 전송' 카테고리의 다른 글
| [11] 대용량 파일 전송 시스템 개발 - 파일 다운로드 (HTTP Transfer-Encoding) (0) | 2026.09.01 |
|---|---|
| [10] 대용량 파일 전송 시스템 개발 - 파일 다운로드 (HTTP 범위 요청) 전체 소스 (0) | 2026.08.28 |
| [8] 대용량 파일 전송 시스템 개발 - 파일 업로드 전체 소스 (0) | 2026.08.25 |
| [7] 대용량 파일 전송 시스템 개발 - 파일 확장자 변조 검증, Tika (0) | 2026.08.23 |
| [6] 대용량 파일 전송 시스템 개발 - 암호화 전송, RSA + AES (0) | 2026.08.23 |