Login이 필요로 하는 Vue에 대해 매번 라우트 별(beforeEnter)로 처리하거나 라우트 전역(beforeEach)으로 URL를 비교하여 처리하기에는 번거로울 수 있습니다. 그래서 라우트(route)의 메타(meta) 필드를 이용하여 처리하는 것이 좋습니다.
Route Meta Fields (라우트 메타 필드)로 처리
1. C:\workspaces\nodeserver\testvue\src\router 폴더에 index.js 파일을 오픈합니다. Login이 필요로 하는 라우트에 meta 필드로 { requireLogin: true }를 추가합니다.
게시물 등록(/boardwrite), 수정(/boardedit)과 스코어(/score)에 meta 필드를 추가합니다.
{
  path: '/boardwrite',
  name: 'BoardWrite',
  component: () => import('../views/BoardWrite.vue'),
  meta: { requireLogin: true }
},
{
  path: '/boardedit',
  name: 'BoardEdit',
  component: () => import('../views/BoardEdit.vue'),
  meta: { requireLogin: true }
},
{
  path: '/score',
  name: 'Score',
  component: () => import('../views/Score.vue'),
  meta: { requireLogin: true }
}
기존 스코어(/score)에 있는 "beforeEnter: Authentication()"는 삭제합니다.
라우트 전역 처리로 이동할 URL에 대한 객체인 to에서 meta 필드에 requireLogin가 true인지 확인하여 Login Vue로 이동하게 합니다.
router.beforeEach((to, from, next) => {
	console.log(to);
	if (to.meta.requireLogin) {
		const isLogin = store.getters['loginStore/isLogin'];
		if (!isLogin) {
			next('/login?returnUrl=' + to.fullPath);
		} else {
			next();
		}
	} else {
		next();
	}
});
확인을 위해 console.log로 to(이동할 URL에 대한 객체)를 출력합니다.
beforeEach() 메서드에서 next() 메서드를 호출하지 않으면 이동이 중지되기 때문에 무조건 next() 메서드가 호출되어야 합니다.
2. 콘솔을 실행하고 Vue 프로젝트가 있는 C:\workspaces\nodeserver\testvue 폴더로 이동합니다. 그리고 콘솔에서 npm run 명령어를 실행합니다.
npm run serve
3. 웹 브라우저에서 "http://localhost:8080/board"를 입력합니다. 쓰기 버튼을 클릭하면 Login 페이지로 이동합니다.

console.log를 확인해 보면 to(이동할 URL에 대한 객체)의 meta 필드에 requireLogin가 true인지 확인할 수 있습니다.

그렇다면 라우트가 중첩되어 있다면 어떻게 처리될까요?
Nested Routes (중첩된 라우트) 처리
1. 중첩된 라우트를 처리하기 위해 라우터(C:\workspaces\nodeserver\testvue\src\router\index.js)에서 다음처럼 게시판의 라우트를 중첩되게 수정합니다.
{
  path: '/board',
  name: 'Board',
  component: () => import('../views/Board.vue'),
  children: [
    {
      path: '',
      name: 'BoardList',
      component: () => import('../views/BoardList.vue')
    },
    {
      path: 'boardview',
      name: 'BoardView',
      component: () => import('../views/BoardView.vue')
    },
    {
      path: 'boardwrite',
      name: 'BoardWrite',
      component: () => import('../views/BoardWrite.vue'),
      meta: { requireLogin: true }
    },
    {
      path: 'boardedit',
      name: 'BoardEdit',
      component: () => import('../views/BoardEdit.vue'),
      meta: { requireLogin: true }
    }
  ]
}
상위 라우트로 Board를 추가하고 하위 라우트로 BoardList, BoardView, BoardWrite, BoardEdit를 변경합니다.
BoardList는 path가 없어 Board와 합쳐져서 path가 "/board"가 됩니다. BoardView, BoardWrite, BoardEdit는 Board와 합쳐져서 path가 "/board/boardview", "/board/boardwrite", "/board/boardedit"가 됩니다.
상위 라우트와 하위 라우트의 path, component, meta가 합쳐져서 처리됩니다.
2. C:\workspaces\nodeserver\testvue\src\views 폴더에 Board.vue 파일을 추가합니다.
<template>
	<div>
		<h1>This is an board header</h1>
		<router-view></router-view>
	</div>
</template>
Board.vue에 있는 "<router-view></router-view>"로 하위 라우트의 컴포넌트가 랜더링 되어 처리됩니다.
3. 웹 브라우저에서 "http://localhost:8080/board"를 입력하면 다음처럼 Board.vue와 BoardList.vue의 컴포넌트가 합쳐져서 나타납니다.
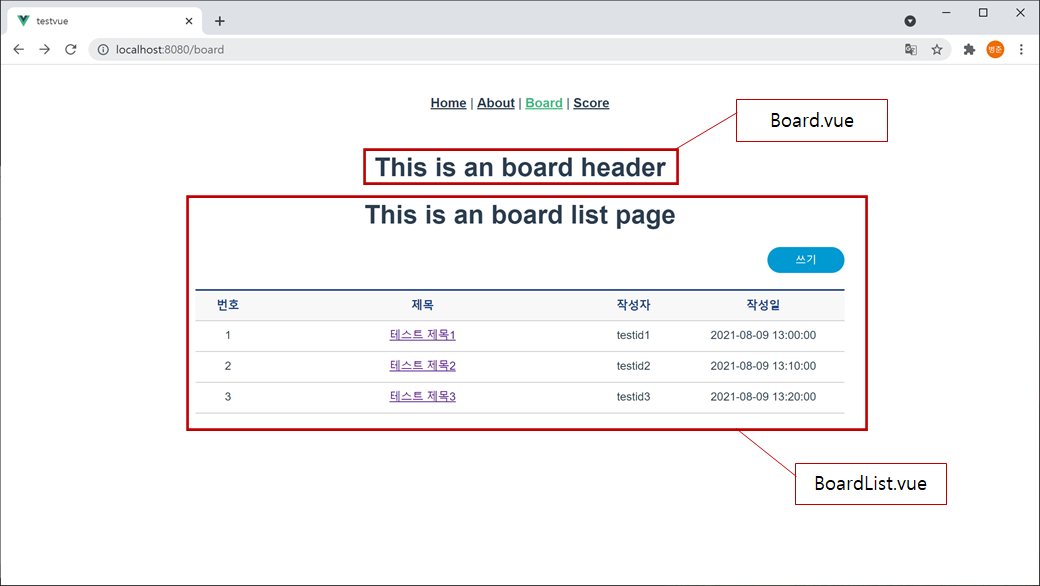
이전 BoardList.vue에서 쓰기 버튼이 경로(path)로 되어 있습니다.
<router-link to="/boardwrite" class="button blue"><span>쓰기</span></router-link>경로(path)는 라우트가 변경되면 수동으로 수정해 주어야 합니다.
<router-link to="/board/boardwrite" class="button blue"><span>쓰기</span></router-link>그래서 <router-link>를 경로(path) 대신 name으로 변경하면 자동으로 중첩된 라우트의 경로로 처리됩니다.
<router-link :to="{name: 'BoardWrite'}" class="button blue"><span>쓰기</span></router-link>
쓰기 버튼을 클릭하면 Login 페이지로 이동합니다.

console.log를 확인해 보면 to(이동할 URL에 대한 객체)의 meta 필드에 requireLogin가 true인지 확인할 수 있습니다.
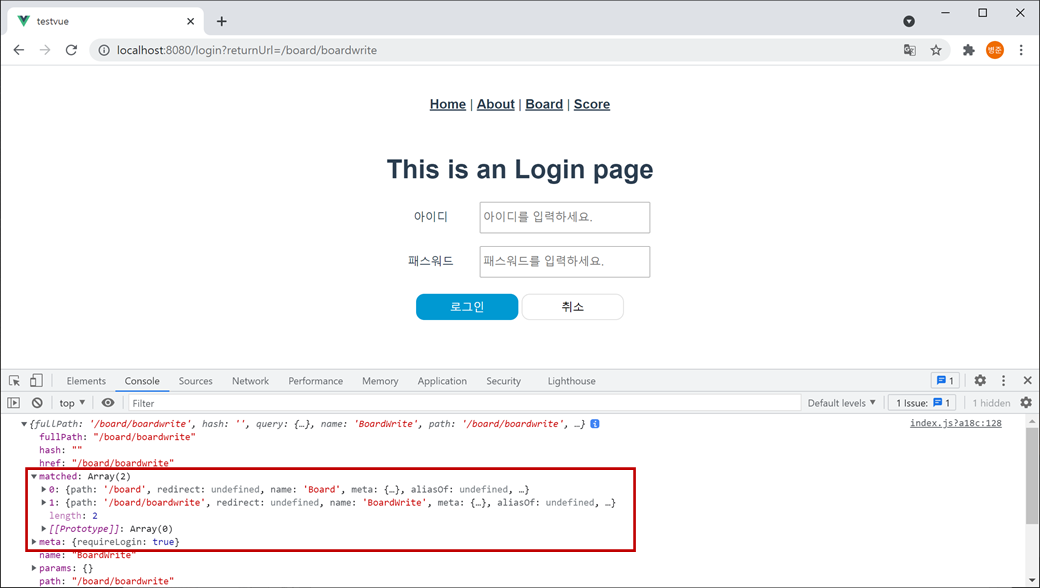
라우트가 중첩이 되어 있어도 상위-하위 라우트에 있는 meta 필드가 모두 합쳐져서 동일하게 처리됩니다.
다음처럼 상위 라우트에 meta 필드로 { requireLogin: true }가 있도 동일하게 처리됩니다. 그러나 게시판 전체가 Login 되어야 접근할 수 있게 됩니다.
{
  path: '/board',
  name: 'Board',
  component: () => import('../views/Board.vue'),
  meta: { requireLogin: true },
  children: [
    {
      path: '',
      name: 'BoardList',
      component: () => import('../views/BoardList.vue')
    },
    {
      path: 'boardview',
      name: 'BoardView',
      component: () => import('../views/BoardView.vue')
    },
    {
      path: 'boardwrite',
      name: 'BoardWrite',
      component: () => import('../views/BoardWrite.vue')
    },
    {
      path: 'boardedit',
      name: 'BoardEdit',
      component: () => import('../views/BoardEdit.vue')
    }
  ]
}
라우트의 meta 필드를 확인하는 또 다른 방법은 라우트의 matched 배열 객체를 이용한 겁니다.
matched 배열 객체로 처리
경로와 일치되는 모든 라우트의 정보가 matched 배열 객체로 적용됩니다.
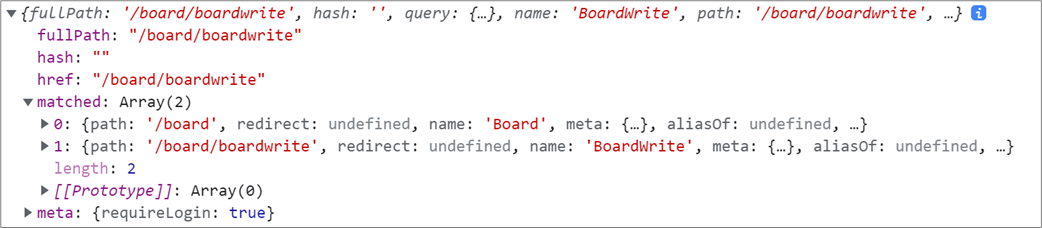
다음은 쓰기 버튼을 클릭한 후 console.log로 출력된 to(이동할 URL에 대한 객체)의 정보입니다. 상위 라우트(Board)와 하위 라우트(BoardWrite)가 중첩되는 순서로 matched 배열에 적용됩니다.
some() 메서드를 이용해 matched 배열에 있는 meta 필드에 requireLogin가 true인지 확인하면 됩니다.
if (to.matched.some(function(record) {
	return record.meta.requireLogin;
	})) {
}
or
if (to.matched.some(record => record.meta.requireLogin)) {
}
some() 메서드는 배열을 순서대로 돌면서 조건이 하나라도 맞으면 true를 리턴합니다.
some() 메서드의 첫 번째 인자는 matched 배열 안의 객체로 route record(라우트 레코드)라고 합니다. 즉 상위부터 하위 라우트가 라우트 레코드로 전달됩니다.
next() 메서드도 경로(path) 대신 name으로 변경하여 자동으로 라우트의 경로로 처리되게 합니다.
//next('/login?returnUrl=' + to.fullPath);
next({name: 'Login', query: { returnUrl: to.fullPath }});
다음은 matched 배열로 처리 변경된 소스입니다.
router.beforeEach((to, from, next) => {
	if (to.matched.some(record => record.meta.requireLogin)) {
		const isLogin = store.getters['loginStore/isLogin'];
		if (!isLogin) {
			next({name: 'Login', query: { returnUrl: to.fullPath }});
		} else {
			next();
		}
	} else {
		next();
	}
});
라우터를 통해 게시물 등록(/board/boardwrite), 게시물 수정(/board/boardedit)에 대해 Login 확인 처리를 하였습니다.
Login 메시지 처리
전달해야 하는 정보가 복잡할 경우 Login 뷰 대신 Login 메시지로 처리해야 할 경우가 있습니다.
라우터에서 전역 처리에서 Login 경로로 보내는 next() 메서드 대신 alert() 메서드로 처리하면 됩니다.
beforeEach() 메서드에서 next() 메서드를 호출하지 않으면 이동이 중지됩니다.
router.beforeEach((to, from, next) => {
if (to.matched.some(record => record.meta.requireLogin)) {
const isLogin = store.getters['loginStore/isLogin'];
if (!isLogin) {
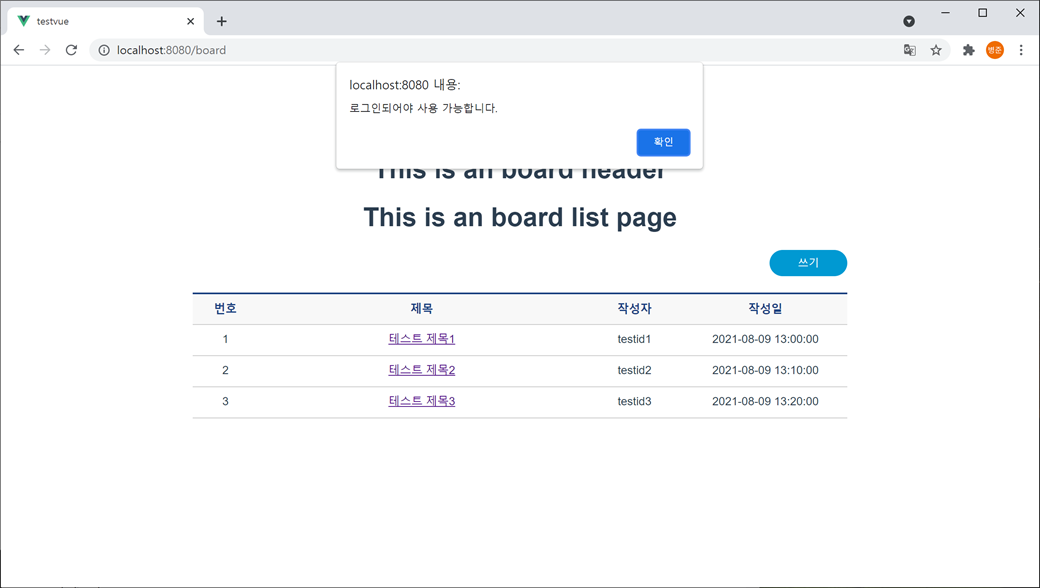
alert("로그인되어야 사용 가능합니다.");
} else {
next();
}
} else {
next();
}
});확인 버튼을 누르면 현재 페이지를 유지합니다.
또는 확인 창(confirm)으로 처리할 수 있습니다.
router.beforeEach((to, from, next) => {
	if (to.matched.some(record => record.meta.requireLogin)) {
		const isLogin = store.getters['loginStore/isLogin'];
		if (!isLogin) {
			var result = confirm("로그인되어야 사용 가능합니다.\n로그인 하시겠습니까?");
			if (result) {
				next({name: 'Login', query: { returnUrl: to.fullPath }});
			}
		} else {
			next();
		}
	} else {
		next();
	}
});
확인 버튼을 누르면 Login으로 이동하고 취소 버튼을 누르면 현재 페이지를 유지합니다.
